
Note: Some images in this blog post are not showing up, please read the same post on medium here.
In this post, we are going to learn how to perform facial analysis on a live feed by setting up a serverless video analytics architecture using Amazon Rekognition Video and Amazon Kinesis Video Streams.
Use cases:
- Intruder notification system
- Employee sign-in system
Architecture overview
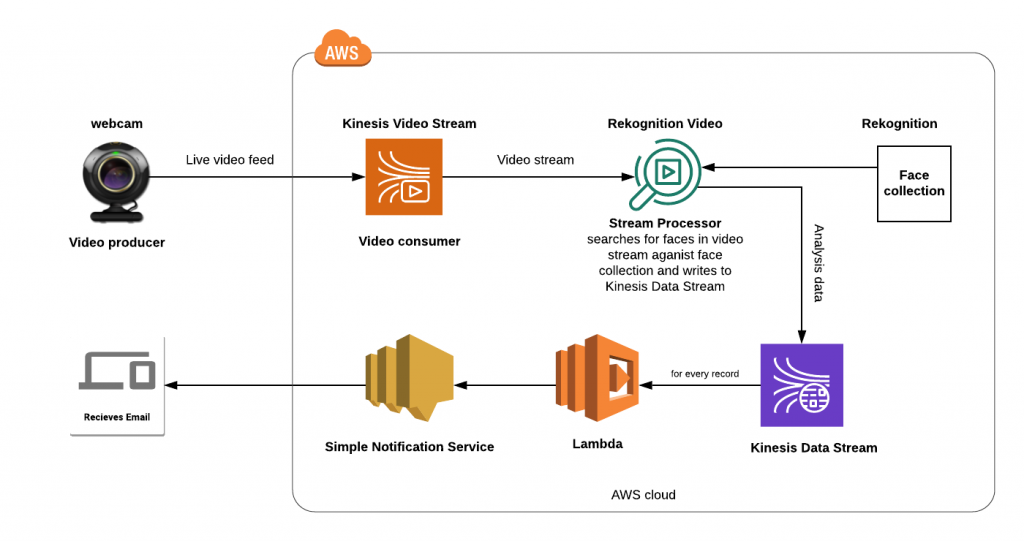
We shall learn how to use the webcam of a laptop (we can, of course, use professional grade cameras and hook it up with Kinesis Video streams for a production ready system) to send a live video feed to the Amazon Kinesis Video Stream. The stream processor in Amazon Rekognition Video picks up this webcam feed and analyses by comparing this feed with the faces in the face collection created beforehand. This analysis is written to the Amazon Kinesis Data Stream. For each record written to the Kinesis data stream, the lambda function is invoked. This lambda reads the record from kinesis stream data. If there are any facial matches or mismatches, depending upon how the lambda is configured an email notification is sent via Amazon SNS (Simple Notification Service) to the registered email addresses.
Note: Make sure all the above AWS resources are created in the same region.
Before going further, make sure you already have the AWS CLI configured on your machine. If not, follow this link – https://docs.aws.amazon.com/cli/latest/userguide/cli-chap-getting-started.html
Step-1: Create Kinesis Video Stream
We need to create the Kinesis Video Stream for our webcam to connect and send the feed to Kinesis Video Streams from AWS console. Create a new one by clicking the Create button. Give the stream a name in stream configuration.

We have successfully created a Kinesis video stream.
Step-2: Send Live Feed to the Kinesis Video Stream
We need a video producer, anything that sends media data to the Kinesis video stream is called a producer. AWS currently provides producer library primarily supported in these four languages(JAVA, Android, C++, C) only. We use the C++ Producer Library as a GStreamer plugin.
To easily send media from a variety of devices on a variety of operating systems, this tutorial uses GStreamer, an open-source media framework that standardizes access to cameras and other media sources.
Download the Amazon Kinesis Video Streams Producer SDK from Github using the following Git command:
git clone https://github.com/awslabs/amazon-kinesis-video-streams-producer-sdk-cpp && cd amazon-kinesis-video-streams-producer-sdk-cpp && git checkout 75087f5a90a02a47191c9278cfec329e09535e98After downloading successfully, you can compile and install the GStreamer sample in the kinesis-video-native-build directory in the cloned repository using the following commands:
For Ubuntu – run the following commands
sudo apt-get update

sudo apt-get install libgstreamer1.0-dev libgstreamer-plugins-base1.0-dev gstreamer1.0-plugins-base-apps

sudo apt-get install gstreamer1.0-plugins-bad gstreamer1.0-plugins-good gstreamer1.0-plugins-ugly gstreamer1.0-tools
For Windows – run the following commands
Inside mingw32 or mingw64 shell, go to kinesis-video-native-build directory and run ./min-install-script For macOS – run the following commands
Install homebrew

Run brew install pkg-config openssl cmake gstreamer gst-plugins-base gst-plugins-good gst-plugins-bad gst-plugins-ugly log4cplus

Go to kinesis-video-native-build directory and run ./min-install-script
Running the GStreamer webcam sample application:
The sample application kinesis_video_gstreamer_sample_app in the kinesis-video-native-build directory uses GStreamer pipeline to get video data from the camera. Launch it with the kinesis video stream name created in Step-1 and it will start streaming from the camera.
AWS_ACCESS_KEY_ID=<YourAccessKeyId> AWS_SECRET_ACCESS_KEY=<YourSecretAccessKey> ./kinesis_video_gstreamer_sample_app <stream_name>After running the above command, the streaming would start and you can see the live feed in Media preview of Kinesis Video Stream created in the Step-1.
Step-3: Creating Resources using AWS CloudFormation Stack
The CloudFormation stack will create the resources that are highlighted in the following image.

- The following link will automatically open a new CloudFormation Stack in us-west-2: CloudFormation Stack.
- Go to View in Designer and edit the template code and click on create stack.
- Change the name of the application from Default.
- Change the Nodejs version of the RekognitionVideoLambda to 10.x (Version 6.10 isn’t supported anymore) and then click on create stack.


Enter your Email Address to receive notifications and then choose Next as shown below:

Skip the Configure stack options step by choosing Next. In the final step you must check the checkbox and then choose Create stack as in the below image:

Once the stack created successfully you can see it in your stacks as below with status CREATE_COMPLETE. This creates the required resources.

Once completed, you will receive a confirmation email to subscribe/receive notifications. Make sure you subscribed to that.

Step-4: Add face to a Collection
As learned earlier the Stream Processor in Amazon Rekognition Video picks up and analyzes the feed coming from Kinesis Video Stream by comparing it with the faces in the face collection. Let’s create this collection.
For more information follow the link – https://docs.aws.amazon.com/rekognition/latest/dg/create-collection-procedure.html
Create Collection: Create a face collection using the AWS CLI on the command line with below command:
aws rekognition create-collection --collection-id <Collection_Name> --region us-west-2Add face(s) to the collection: You can use your picture for testing.
First we need to upload the image(s) to an Amazon S3 bucket in the us-west-2 region. Run the below command by replacing BUCKET_NAME, FILE_NAME with your details and you can give any name for FACE-TAG ( can be name of the person).
aws rekognition index-faces --image '{"S3Object":{"Bucket":"<BUCKET_NAME>","Name":"<FILE_NAME>.jpeg"}}' --collection-id "rekVideoBlog" --detection-attributes "ALL" --external-image-id "<FACE-TAG>" --region us-west-2After that you will receive a response as output as shown below

Now we all ready to go further. If you have multiple photos run the above command again with the new file name.
Step-5: Creating the Stream Processor
We need to create a stream processor which does all the work of reading video stream, facial analysis against face collection and finally writing the analysis data to Kinesis data stream. It contains information about the Kinesis data stream, Kinesis video stream, Face collection ID and the role that is used by Rekognition to access Kinesis Video Stream.
Copy meta info required:
Go to your Kinesis video stream created in step-1, note down the Stream ARN (KINESIS_VIDEO_STREAM_ARN) from the stream info as shown below:

Next from the CloudFormation stack output note down the values of KinesisDataStreamArn (KINESIS_DATA_STREAM_ARN) and RecognitionVideoIAM (IAM_ROLE_ARN) as shown below:

Now create a JSON file in your system that contains the following information:
{
       "Name": "streamProcessorForRekognitionVideoBlog",
       "Input": {
              "KinesisVideoStream": {
                     "Arn": "<KINESIS_VIDEO_STREAM_ARN>"
              }
       },
       "Output": {
              "KinesisDataStream": {
                     "Arn": "<KINESIS_DATA_STREAM_ARN>"
              }
       },
       "RoleArn": "<IAM_ROLE_ARN>",
       "Settings": {
              "FaceSearch": {
                     "CollectionId": "COLLECTION_NAME",
                     "FaceMatchThreshold": 85.5
              }
       }
}
Create the stream processor with AWS CLI from command line with following command:
aws rekognition create-stream-processor --region us-west-2 --cli-input-json file://<PATH_TO_JSON_FILE_ABOVE>Now start the stream processor with following command:
aws rekognition start-stream-processor --name streamProcessorForRekognitionVideoBlog --region us-west-2You can see if the stream processor is in a running state with following command:
aws rekognition list-stream-processors --region us-west-2If it’s running, you will see below response:

And also make sure your camera is streaming in command line and feed is being received by the Kinesis video stream.
Now you would get notified whenever known or an unknown person shows up in your webcam.
Example notification:

Note:
- Lambda can be configured to send email notification only if unknown faces are detected or vice versa.
- For cost optimization, one could use a python script to call Amazon Rekognition service with a snapshot only when a person is detected instead of wasting resources in uninhabited/unpeopled area.
Step-6: Cleaning Up Once Done
Stop the stream processor.
aws rekognition stop-stream-processor --name streamProcessorForRekognitionVideoBlog --region us-west-2Delete the stream processor.
aws rekognition delete-stream-processor --name streamProcessorForRekognitionVideoBlog --region us-west-2Delete the Kinesis Video Stream. Go to the Kinesis video streams from AWS console and select your stream and Delete.
Delete the CloudFormation stack. Go to the CloudFormation, then select stacks from AWS console and select your stack and Delete.
Thanks for the read! I hope it was both fun and useful.
This story is co-authored by Venu and Koushik. Venu is a software engineer and machine learning enthusiast. Koushik is a software engineer and a keen data science and machine learning enthusiast.
Comments
When i try to run “AWS_ACCESS_KEY_ID= AWS_SECRET_ACCESS_KEY= ./kinesis_video_gstreamer_sample_app ” i receive this message “-bash:./kinesis_video_gstreamer_sample_app: No such file or directory”.
Hi Camila,
Some images aren’t showing up in the wordpress post, we are working on resolving it.
Seems like you may have missed out on a few steps. You could view the full story again on medium here.
https://medium.com/zenofai/real-time-face-identification-on-live-camera-feed-using-amazon-rekognition-video-and-kinesis-video-52b0a59e8a9
Regarding your issue:
AWS_ACCESS_KEY_ID=”give access key” AWS_SECRET_ACCESS_KEY=”give secret key” ./kinesis_video_gstreamer_sample_app “give stream name”
please assign values for all these keys.
Hi,
Thanks for this great blog post. It is very well explained and accurate. Yet, I have an issue with the live video stream. I manage to create it and it is streaming, yet when I look at the see the live feed in the Media preview of Kinesis Video Stream I see that actually the video image is of static snow only. I am using my macbook built in camera.
Any idea ?
Many thanks !
Roy
Hi Roy,
Some images in this WordPress blog post aren’t showing up, we are working on resolving it.
It seems like you may have missed out on a few steps. You could view the full story with all images again on medium here.
https://medium.com/zenofai/real-time-face-identification-on-live-camera-feed-using-amazon-rekognition-video-and-kinesis-video-52b0a59e8a9
Regarding your issue,
In your case, we aren’t sure exactly what went wrong. You can follow the same post on medium again and revert to us if the problem persists.
Hi
Thanks for the useful tutorial. I have the video stream set up – but I am in EU-WEST-1 region. I get an error message in the stack events for the template provided:
*Error occurred while GetObject. S3 Error Code: PermanentRedirect. S3 Error Message: **The bucket is in this region: us-west-2.** Please use this region to retry the request (Service: AWSLambdaInternal; Status Code: 400; Error Code: InvalidParameterValueException; Request ID: a22355ef-086f-4915-9833-611cc65a6962)*
The code in the template is referencing a bucket and a key contaning a path to a zip file:
“S3Bucket”: “us-west-2.serverless-analytics”,
“S3Key”: “KinesisVideoRekognitionVideo-blog/Lambda.zip”
I don’t have that zip file, is it a standard Lambda thing? What do I need to change to get the template to work in EU-WEST-1?
Hi Travis,
Firstly thank you for the detailed question.
The Cloudformation template is trying to fetch the code for the lambda function from serverless-analytics bucket in us-west2, it seems like it’s bucket policy is set to work only with certain regions.
One thing you could do is using aws-cli, copy the code files to a local directory and re-upload it to any temporary us-west-2 bucket in your AWS account. Then edit the template to use the new location where the code is uploaded.
Command:
aws s3 cp s3://serverless-analytics/KinesisVideoRekognitionVideo-blog/Lambda.zip Desktop/code/
I have tried the above command with the default region being us-east-1. It worked.
Hi team, Great post! I have a few questions, I’d love to hear your thoughts:
1. Latency: What is the latency of video stream and face recognition you observed using this Kinesis + Lambda based architecture? In other words, how long does it take for a video frame to be sent from edge device to the cloud, and to the face recognition/ analysis to get an alert?
2. Costs: How much would it take to have a live face recognition system from a camera using this system, with and without the optimizations you suggested?
Thank you so much, please keep the articles coming!
Hi Pavan,
Latency:
As AWS services latency is almost a constant, only variables are internet speed and the machine’s RAM. They determine how effective the transmission of the webcam feed to the Kinesis video stream actually is.
We didn’t accurately measure the latency but the notifications via email were flowing in almost instantaneously as far as I could remember.
We could also configure to send out SMS notifications if needed.
We streamed using the webcam of our Linux machine running on an 8GB RAM on a 93Mbps(average) internet connection.
Costs:
How AWS costs vary depending on the type of service and the configuration we set.
visit https://calculator.s3.amazonaws.com/index.html to calculate the cost of the services used in the setup.
With Optimizations:
A Raspberry pi 4 module that runs an OpenCV script 24/7 to detect human faces on the cam feed and only then send a request to kinesis(AWS). With this optimization, we won’t be using AWS services 24/7 but only when a human face is detected. By doing so costs are significantly reduced.
Raspberry pi 4 (tiny computer) – $90
Logitech webcam – $24
Hi there,
Thanks so much for sharing the great blog.
I tried to follow the steps, however wan’t sure where to find the kinesis-video-native-build directory in Step #2.
I would really appreciate if you could point it out.
Thanks in advance
Ray
Hi Ray,
You have been cloning the latest release of the library. We have built this setup sometime last year, since then there have been many commits/changes to the repository and folders in the library have been completely changed. Please delete the existing repository and run this command to get the version we used back then.
git clone https://github.com/awslabs/amazon-kinesis-video-streams-producer-sdk-cpp && cd amazon-kinesis-video-streams-producer-sdk-cpp && git checkout 75087f5a90a02a47191c9278cfec329e09535e98
After this, you will find the kinesis-video-native-build directory, in the newly cloned repository. The rest is all the same.
PS: Also updated the command in the blog, you can start from scratch if need be.
I tried these steps on an Ubuntu server in aws and they pushed mp4 data to kvs as there was no webcam attached. And I have taken screenshot of the mp4 video and put in the rekognition collection. But I don’t get alert. What can be the cause?