
In this blog, we shall learn how to build an AI virtual assistant or a Chatbot using React Native and Dialogflow API.
Why are chatbots important?
A chatbot is a piece of software that helps in conducting a conversation through voice based or textual methods. Chatbots offer companies new opportunities to improve the customer engagement process and operational efficiency by reducing the typical cost of customer service.

What is Dialogflow?
Dialogflow (previously known as API.AI) is a Natural Language Processing (NLP) platform which can be greatly helpful to build conversational applications for a company’s customers in various languages and also across multiple platforms. Dialogflow enables developers to create text-based and voice conversation interfaces for responding to customer queries in different languages.
Why Dialogflow?
There are different chatbot SDK’s like Dialogflow, Amazon Lex, IBM Watson, Microsoft Bot Framework etc. The reasons to why we chose to use Dialogflow are:
- Dialogflow supports multiple platforms.
- Dialogflow supports all the devices like wearables, phones and other devices.
- Dialogflow also supports multiple languages.
How Dialogflow works?
In Dialogflow, the typical flow of any conversation involves these steps:
- The user providing an input.
- Dialogflow agent parsing that input based on the intent.
- Agent returning a response to the user.

Setting up Dialogflow account:
Navigate to console in the official website. After navigating to console you will be prompted to sign in with Google, go ahead and sign-in. After successfully signing in you can see a dashboard.
Before we dive into the platform and start building the bot/agent, let us learn about the terms used in Dialogflow.
After signing in, you could see a Create Agent tab. An agent is nothing but the bot that you would like to create. Give a name of your choice and click on the Create button. After creating successfully you could see multiple tabs on the left side of the screen like:
- Intents
- Entities
- Fulfillment etc

Intents:
An Intent is a specific action that the user can invoke by using one of the defined terms in the Dialogflow console.
For example, the user could ask “What’s the time?” or “What is today’s date?” if these terms are defined within the console, then they will be detected by Dialogflow and intents that are defined under will get triggered.
You can create an intent by clicking on create intent as shown below.

You shall see some default intents already available. We can create the new intents here.
Entities:
An Entity is a property which can be used by Dialogflow to answer the request from the user. The entity will usually be a keyword within the request such as a name, date, time etc.
Dialogflow has a rich set of predefined entities and also has an option that enables the developer to define custom entities as well.
Fulfillment:
When the user provides the input, Dialogflow needs to process the user input which might contain entities as well. Hence Dialogflow needs to request the information from web-hook so as to fulfill the users request. The input provided by the user along with entities is then sent to the web-hook so that the required information can be retrieved. Once the Dialogflow receives the information from web-hook it sends the response back to the user in the desired manner.
For example, if the user wants to know about weather conditions, a web-hook could be used to get info about weather and pass it on to the user.
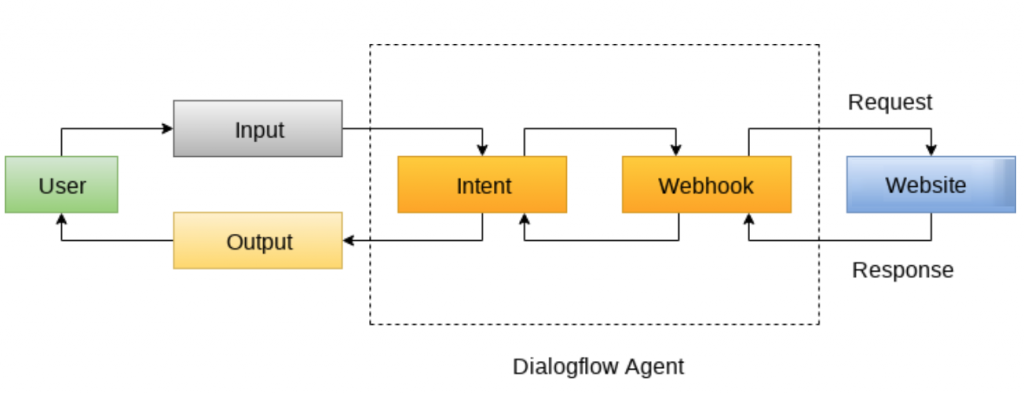
Response:
It is the content which Dialogflow sends back to the user once the user’s query is processed.
Creating a ChatBot for Health care:
Now that we have learnt about some basic terms of Dialogflow, let us start building a chatbot (in this case Healthbot) which helps the user (patient) to schedule an appointment with a specific doctor in an organization.
Let’s go ahead and create an agent first. Here we are creating an agent with the name HealthBot.

After clicking the create button, the HealthBot agent would be created. It would look like below.

You could see some default intents there. We can create our own intents here. So, let’s move forward and start creating the intents.
The intent we will be creating here is “Schedule an Appointment”.
Save the intent after creating. In the Training Phrases section, we can add our own training phrases to train the agent.
When we add a particular training phrase , Dialogflow would look for predefined entities in the phrase, if found it will highlight them as shown.

Add few other relative training phrases and click on save.

Next in the Action and Parameters section we can make the @sys.person, @sys.date, @sys.time as required by checking on the Required checkbox. We can also define the prompts for the required fields so that if the user does not provide any one of them the defined prompt will be shown up asking the user to provide the required parameters.
The prompts for the entities could be defined by clicking define prompts under Prompts. Below are the prompts for the respective entities.


Next we have to add the response in the Response section.
After receiving all the required parameters from the user , we can phrase a response like shown.

Now we have to create a front end app using React Native which would communicate with the HealthBot agent.
Let’s go to React Native Docs, select React Native CLI Quickstart and select the appropriate development OS and the target OS as Android, as we are going to build an android application.
Follow the docs for installing dependencies, then create a new react native application. Use the command line interface to create a new react native project.
react-native init <project-name>By using the below commands you can run the app on android device. You could see the default welcome page.
cd <project-name>
Npm install
React-native run-android
Note: If you face an issue like “Failed to install the app. Make sure you have the Android development environment set up”, just traverse to <project-name>/android folder and create a file named local.properties and add the Android SDK path in it as shown here.
sdk.dir = Your Android SDK PathWe also need to install some dependencies using below command.
npm install react-native-gifted-chat
react-native-dialogflow -save
We are using react-native-gifted-chat package as it provides a customizable and complete chat UI interface.
We are also using react-native-dialogflow so that we can bridge our app with Google Dialogflow’s SDK.
For our app to communicate with Dialogflow agent, we need to configure few things. For that create any .js file in your project root folder (in this env.js).
We need to configure few values in env.js file.
To get the values click on the Service Account link as shown in the image.
You can get this by clicking on the gear icon present beside the agent name on the left side of the screen.

After clicking the link , you would be shown a table called Service accounts for project “<Agent Name>”. Click on Actions and select create key option from there. A prompt will appear asking to choose an option. Select JSON and click on create. A json file would be downloaded. Just copy the contents of the json file and add it in env.js.

Your env.js file would look like below.
env.js
export const dialogflowConfig = {
  "type": "service_account",
  "project_id": "Health-bot",
  "private_key_id": "xxxx",
  "private_key": "-----BEGIN PRIVATE KEY-----\n xxxx\n-----END PRIVATE KEY-----\n",
  "client_email": "xxxx",
  "client_id": "xxxx",
  "auth_uri": "xxxx",
  "token_uri": "xxxx",
  "auth_provider_x509_cert_url": "xxxx",
  "client_x509_cert_url": "xxxx"
}
Now go to <project-name> directory and open App.js. Modify the content of App.js as below.
App.js
import React, { Component } from 'react';
import {View} from 'react-native';
import { GiftedChat } from 'react-native-gifted-chat';
import { Dialogflow_V2 } from 'react-native-dialogflow';
import { dialogflowConfig } from './env';

const BOT_USER = {
  _id: 2,
  name: 'Health Bot',
  avatar: 'https://previews.123rf.com/images/iulika1/iulika11909/iulika1190900021/129697389-medical-worker-health-professional-avatar-medical-staff-doctor-icon-isolated-on-white-background-vec.jpg'
};
class App extends Component {

  state = {
    messages: [
      {
        _id: 1,
        text: 'Hi! I am the Healthbot 🤖.\n\nHow may I help you today?',
        createdAt: new Date(),
        user: BOT_USER
      }
    ]
  };

  componentDidMount() {
    Dialogflow_V2.setConfiguration(
      dialogflowConfig.client_email,
      dialogflowConfig.private_key,
      Dialogflow_V2.LANG_ENGLISH_US,
      dialogflowConfig.project_id
    );
  }

  onSend(messages = []) {
    this.setState(previousState => ({
      messages: GiftedChat.append(previousState.messages, messages)
    }));

    let message = messages[0].text;
    Dialogflow_V2.requestQuery(
      message,
      result => this.handleGoogleResponse(result),
      error => console.log(error)
    );
  }

  handleGoogleResponse(result) {
    let text = result.queryResult.fulfillmentMessages[0].text.text[0];
    this.sendBotResponse(text);
  }

  sendBotResponse(text) {
    let msg = {
      _id: this.state.messages.length + 1,
      text,
      createdAt: new Date(),
      user: BOT_USER
    };

    this.setState(previousState => ({
      messages: GiftedChat.append(previousState.messages, [msg])
    }));
  }

  render() {
    return (
      <View style={{ flex: 1, backgroundColor: '#fff' }}>
        <GiftedChat
          messages={this.state.messages}
          onSend={messages => this.onSend(messages)}
          user={{
            _id: 1
          }}
        />
      </View>
    );
  }
}
export default App;
When the App.js file renders, the first thing it renders is componentDidMount() where we set the configuration of Dialogflow as given below.
componentDidMount() {
    Dialogflow_V2.setConfiguration(
      dialogflowConfig.client_email,
      dialogflowConfig.private_key,
      Dialogflow_V2.LANG_ENGLISH_US,
      dialogflowConfig.project_id
    );
  }
When you click on send , it will trigger the onSend() method where the user message gets stored in the state variable and we will send a request to Dialogflow using Dialogflow_V2.requestQuery. If the response is successful, handleGoogleResponse() method gets triggered.
onSend(messages = []) {
    this.setState(previousState => ({
      messages: GiftedChat.append(previousState.messages, messages)
    }));

    let message = messages[0].text;
    Dialogflow_V2.requestQuery(
      message,
      result => this.handleGoogleResponse(result),
      error => console.log(error)
    );
  }
handleGoogleResponse() will get the text from the response and triggers sendBotResponse() method where it will set the state to response as shown below
handleGoogleResponse(result) {
    let text = result.queryResult.fulfillmentMessages[0].text.text[0];
    this.sendBotResponse(text);
  }

  sendBotResponse(text) {
      let msg = {
        _id: this.state.messages.length + 1,
        text,
        createdAt: new Date(),
        user: BOT_USER
      };

      this.setState(previousState => ({
        messages: GiftedChat.append(previousState.messages, [msg])
      }));
    }
Below are the images of the app running on an Android device.


That’s it folks, we hope it was fun and useful.
This story is authored by Dheeraj Kumar and Santosh Kumar. Dheeraj is a software engineer specializing in React Native and React based frontend development. Santosh specializes on Cloud Services based development.
Comments
Congratulations. It is a beautiful example of how to use DialogFlow and react native;
I am using redux and redux-thunk and the app shows an error when trying to generate the token on the line:
dialogflow2.accessToken = await dialogflow2.generateAccessToken (clientEmail, privateKey);
I believe it is because the token generation is synchronous.
When I call the component directly, without going through redux, the application works perfectly.
Can you help me with that?
Thanks, Richard.
Honestly, we haven’t built that app with redux yet, to know about the issue you are facing.
We appreciate your experimental nature. We will soon write a blog post on it.