
In our earlier blog post, we had built a Text Detection App with React Native using AWS Rekognition. The Text Detection App basically detects the texts and their dimensions in the captured image. This blog is an extension to it, where we shall learn how to draw Bounding Boxes using the dimensions of the detected text in the image. Assuming you had followed our earlier blog and created the Text Detection App we will proceed further.
The following diagram depicts the architecture we will be building.

The React app sends the image to be processed via an API call, detect_text lambda function stores it in S3 and calls Amazon Rekognition with its URL to get the detected texts along with their dimensions. With this data it invokes the draw_bounding_box lambda function, it fetches the image from S3, draws the bounding boxes and stores it as a new image. With new URL it responds back to detect_text lambda which in turn responds back to the app via API gateway with the image URL having bounding boxes.
In our previous blog we already have finished detecting the text part, let us look at creating the rest of the setup.
We will use another AWS lambda function to draw bounding boxes and that function would need OpenCV.
OpenCV (Open Source Computer Vision Library) is an open-source computer vision and machine learning software library which was built to provide a common infrastructure for computer vision applications and to accelerate the use of machine perception in the commercial products.
Preparing the package for draw_bounding_box Lambda:
We need OpenCV, Numpy libraries for image manipulation but lambda doesn’t support these libraries by default. We have to prepare them and upload them. So, we will be preparing the lambda code as a package locally and then upload.
To prepare these libraries, follow this link. After finishing the process you will get a zip file. Unzip the file and copy the below lambda code in .py file.
Note: The name of this .py file should be the same as your lambda index handler.
default name: lambda_handler
lambda_handler.py:
import cv2
import boto3
import numpy as np
import base64
import json

def lambda_handler(event, context):
    bucketName='<-Your-Bucket-Name->'
    s3_client = boto3.client('s3')

    s3 = boto3.resource('s3')
    bucket = s3.Bucket(bucketName)

    # reading image name from event object
    obj = bucket.Object(key=event['image'])
    # Image we read from S3 bucket
    response = obj.get()

    imgContent = response["Body"].read()
    np_array = np.fromstring(imgContent, np.uint8)
    ''' we can read an image using cv2.imread() or np.fromstring(imgContent, np.uint8) followed by image_np = cv2.imdecode(np_array, cv2.IMREAD_COLOR).    '''
    image_np = cv2.imdecode(np_array, cv2.IMREAD_COLOR)

    '''
    imdecode reads an image from the specified buffer in the memory.
    If the buffer is too short or contains invalid data, the empty matrix/image is returned.
    In OpenCV you can easily read in images with different file formats (JPG, PNG, TIFF etc.) using imread
    '''
    height, width, channels = image_np.shape
    # reading dimensions from the event object
    dimensions=json.loads(event['boundingBoxDimensions'])

    for dimension in dimensions:
        leftbox = int(width * dimension['Left'])
        topbox = int(height * dimension['Top'])
        widthbox = int(width * dimension['Width'])
        heightbox = int(height * dimension['Height'])
        # Using cv2.rectangle, we will draw a rectangular box with respect to dimensions
        k=cv2.rectangle(image_np, (leftbox, topbox), (leftbox+widthbox, topbox+heightbox) ,(0, 255, 0), 2)

    # used to write the image changes in a local image
    # For that create any folder(here tmp) and place any sample image(here sample.jpeg) in it. If not, we would encounter the following error.
‘Utf8’ codec can’t decode byte 0xaa in position 1: invalid start byte: UnicodeDecodeError.

    cv2.imwrite("/tmp/sample.jpeg", k)

    newImage="<-New-Image-Name->"
    # we put the image in S3. And return the image name as we store the modified image in S3
    s3_client.put_object(Bucket=bucketName, Key=newImage, Body=open("/tmp/sample.jpeg", "rb").read())

    return {
        'statusCode': 200,
        'imageName':newImage,
        'body': 'Hello from Lambda!'
    }
The package folder structure would look like below.
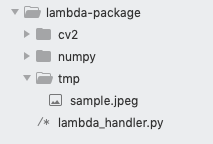
As these files exceed the Lambda upload limit, we will be uploading them to S3 and then add it from there.
Zip this lambda-package and upload it to S3. You can paste its S3 URL to your function code and change the lambda runtime environment to use Python 2.7 (OpenCV dependency).
Invoking draw_bounding_box lambda
The detect_text lambda invokes draw_bounding_box lambda in RequestResponse mode, which means detect_text lambda waits for the response of draw_bounding_box lambda.
The draw_bounding_box lambda function reads the image name and box dimensions from the event object. Below is the code for detect_text lambda which invokes the draw_bounding_box lambda function.
detect_text.js
const AWS = require('aws-sdk');
// added package
const S3 = new AWS.S3({signatureVersion: 'v4'});

var rekognition = new AWS.Rekognition();
var s3Bucket = new AWS.S3( { params: {Bucket: "<-Your-Bucket-Name->"} } );
var fs = require('fs');
// To invoke lambda function
var lambda = new AWS.Lambda();

exports.handler = (event, context, callback) => {
    let parsedData = JSON.parse(event);
    let encodedImage = parsedData.Image;
    var filePath = parsedData.name;

    let buf = new Buffer(encodedImage.replace(/^data:image\/\w+;base64,/, ""),'base64');
    var data = {
        Key: filePath,
        Body: buf,
        ContentEncoding: 'base64',
        ContentType: 'image/jpeg'
    };
    s3Bucket.putObject(data, function(err, data){
        if (err) {
            console.log('Error uploading data: ', data);
            callback(err, null);
        } else {
            var params = {
                Image: {
                    S3Object: {
                        Bucket: "your-s3-bucket-name",
                        Name: filePath
                    }
                }
            };

            rekognition.detectText(params, function(err, data) {
                if (err){
                    console.log(err, err.stack);
                    callback(err);
                }
                else{
                    console.log("data: ",data);
                    var detectedTextFromImage=[];
                    var geometry=[];
                    for (item in data.TextDetections){
                      if(data.TextDetections[item].Type === "LINE"){
                        geometry.push(data.TextDetections[item].Geometry.BoundingBox);
                        detectedTextFromImage.push(data.TextDetections[item].DetectedText);
                      }
                    }
                    var dimensions=JSON.stringify(geometry);
                    var payloadData={
                        "boundingBoxDimensions":dimensions,
                        "image": filePath
                    };

                    var params = {
                        FunctionName: 'draw_bounding_box',
                        InvocationType: "RequestResponse",
                        Payload: JSON.stringify(payloadData)
                    };

                    lambda.invoke(params, function(err, data) {
                        if (err){
                            console.log("error occured");
                            console.log(err);
                        }
                        else{
                            var jsondata=JSON.parse(data.Payload);
                            var params = {
                                Bucket: "your-s3-bucket-name",
                                Key: jsondata.imageName,
                            };
                            s3Bucket.getSignedUrl('getObject', params, function (err, url) {
                                var responseData={
                                        "DetectedText":detectedTextFromImage,
                                    "url":url
                                }
                                callback(null, responseData);
                            });
                        }
                    });
                    console.log("waiting for response");
                }
            });
        }
    });
};
Everything is similar except the rekognition.detectText() function. Upon success, we are storing the detected text in a list and dimensions in another list. Next, we need to pass the dimensions list and image name as arguments to the draw_bounding_box lambda function.
var payloadData={
    "boundingBoxDimensions":dimensions,
    "image": filePath
};

var params = {
    FunctionName: 'draw_bounding_box',
    InvocationType: "RequestResponse",
    Payload: JSON.stringify(payloadData)
};
lambda.invoke(params, function(err, data) {
    if (err){
        console.log("error occured");
        console.log(err);
    }
    else{
        var jsondata=JSON.parse(data.Payload);
        var params = {
            Bucket: "your-s3-bucket-name",
            Key: jsondata.imageName,
        };
        s3Bucket.getSignedUrl('getObject', params, function (err, url) {
            var responseData={
                "DetectedText":detectedTextFromImage,
                "url":url
            }
            callback(null, responseData);
        });
    }
});
Lambda.invoke() expects two arguments where the first argument needs to be an object which contains the name of the lambda function, invocation type, payload data. And the second argument is to handle success or failure response. When the detect_text lambda function invokes the draw_bounding_box function, it will process the image and give the response back to the detect_text lambda function. Upon success, we get the JSON object which contains the modified image name.
Next, we use s3Bucket.getSignedUrl() to get the image URL which we will send to our React Native App with detected text also as a response.
Replace the existing App.js file, in react-native with the code below.
App.js
import React, {Component} from 'react';
import {
    StyleSheet,
    View,
    Text,
    TextInput,
    Image,
    ScrollView,
    TouchableHighlight,
    ActivityIndicator
} from 'react-native';
import ImagePicker from "react-native-image-picker";
import Amplify, {API} from "aws-amplify";
Amplify.configure({
    API: {
        endpoints: [
            {
                name: "<-Your-API-name->",
                endpoint: "<-Your-end-point-url->"
            }
        ]
    }
});

class Registration extends Component {

    constructor(props){
        super(props);
        this.state =  {
            isLoading : false,
            showInputField : false,
            imageName : '',
            capturedImage : '',
            detectedText: []
        };
    }

    captureImageButtonHandler = () => {
        ImagePicker.showImagePicker({title: "Pick an Image", maxWidth: 800, maxHeight: 600}, (response) => {
            console.log('Response - ', response);
            if (response.didCancel) {
                console.log('User cancelled image picker');
            } else if (response.error) {
                console.log('ImagePicker Error: ', response.error);
            } else if (response.customButton) {
                console.log('User tapped custom button: ', response.customButton);
            } else {
                const source = { uri: 'data:image/jpeg;base64,' + response.data };
                this.setState({
                    imageName: "IMG-" + Date.now(),
                    showInputField: true,
                    capturedImage: response.uri,
                    base64String: source.uri
                })
            }
        });
    }

    submitButtonHandler = () => {
        this.setState({
            isLoading: true
        })
        if (this.state.capturedImage == '' || this.state.capturedImage == undefined || this.state.capturedImage == null) {
            alert("Please Capture the Image");
        } else {
            console.log("submiting")
            const apiName = "<-Your-API-name->";
            const path = "/API-path";
            const init = {
                headers: {
                    'Accept': 'application/json',
                    "Content-Type": "application/x-amz-json-1.1"
                },
                body: JSON.stringify({
                    Image: this.state.base64String,
                    name: this.state.imageName
                })
            }

            API.post(apiName, path, init).then(response => {
                this.setState({
                    capturedImage: response.url,
                    detectedText: response.DetectedText,
                    isLoading:false
                })
            });
        }
    }

    render() {
        let inputField;
        let submitButtonField;
        if (this.state.showInputField) {
            inputField=
                    <View style={styles.buttonsstyle}>
                        <TextInput
                            placeholder="Img"
                            value={this.state.imageName}
                            onChangeText={imageName => this.setState({imageName: imageName})}
                            style={styles.TextInputStyleClass}
                        />
                    </View>;
            submitButtonField=<TouchableHighlight style={[styles.buttonContainer, styles.submitButton]} onPress={this.submitButtonHandler}>
                            <Text style={styles.buttonText}>Submit</Text>
                        </TouchableHighlight>

        }

        return (
            <View style={styles.screen}>
                <ScrollView>
                    <Text style= {{ fontSize: 20, color: "#000", textAlign: 'center', marginBottom: 15, marginTop: 10 }}>Text Extracter</Text>

                    {this.state.capturedImage !== "" && <View style={styles.imageholder} >
                        <Image source={{uri : this.state.capturedImage}} style={styles.previewImage} />
                    </View>}
                    {inputField}
                    {this.state.isLoading && (
                        <ActivityIndicator
                            style={styles.Loader}
                            color="#C00"
                            size="large"
                        />
                    )}
                    <View>
                        {
                       this.state.detectedText.map((data, index) => {
                       return(
                           <Text key={index} style={styles.DetextTextView}>{data}</Text>
                       )})
                       }
                    </View>
                    <View style={styles.buttonsstyle}>
                        <TouchableHighlight style={[styles.buttonContainer, styles.captureButton]} onPress={this.captureImageButtonHandler}>
                            <Text style={styles.buttonText}>Capture Image</Text>
                        </TouchableHighlight>
                        {submitButtonField}
                    </View>
                </ScrollView>
            </View>
        );
    }
}

const styles = StyleSheet.create({
    Loader:{
        flex: 1,
        justifyContent: 'center',
        alignItems: 'center',
        height: "100%"
    },
    screen:{
        flex:1,
        justifyContent: 'center',
    },
    buttonsstyle:{
        flex:1,
        alignItems:"center"
    },
    DetextTextView:{
      textAlign: 'center',
    },
    TextInputStyleClass: {
      textAlign: 'center',
      marginBottom: 7,
      height: "70%",
      margin: 10,
      width:"80%"
    },
    inputContainer: {
      borderBottomColor: '#F5FCFF',
      backgroundColor: '#FFFFFF',
      borderRadius:30,
      borderBottomWidth: 1,
      width:"90%",
      height:45,
      marginBottom:20,
      flexDirection: 'row',
      alignItems:'center'
    },
    buttonContainer: {
      height:45,
      flexDirection: 'row',
      alignItems: 'center',
      justifyContent: 'center',
      borderRadius:30,
      margin: 5,
    },
    captureButton: {
      backgroundColor: "#337ab7",
      width: "90%",
    },
    buttonText: {
      color: 'white',
      fontWeight: 'bold',
    },
    horizontal: {
      flexDirection: 'row',
      justifyContent: 'space-around',
      padding: 10
    },
    submitButton: {
      backgroundColor: "#C0C0C0",
      width: "90%",
      marginTop: 5,
    },
    imageholder: {
      borderWidth: 1,
      borderColor: "grey",
      backgroundColor: "#eee",
      width: "50%",
      height: 150,
      marginTop: 10,
      marginLeft: 90,
      flexDirection: 'row',
      alignItems:'center'
    },
    previewImage: {
      width: "100%",
      height: "100%",
    }
});

export default Registration;
Below are the screenshots of the React Native App running on an Android device.
We used the below image to extract text and add bounding boxes.


The image name is generated dynamically with epoch time, which is editable.


I hope it was helpful, thanks for the read!
This story is authored by Dheeraj Kumar and Santosh Kumar. Dheeraj is a software engineer specializing in React Native and React based frontend development. Santosh specializes on Cloud Services based development.
Comments