
In this post, we are going to build a React Native app for detecting objects from an image using Amazon Rekognition.
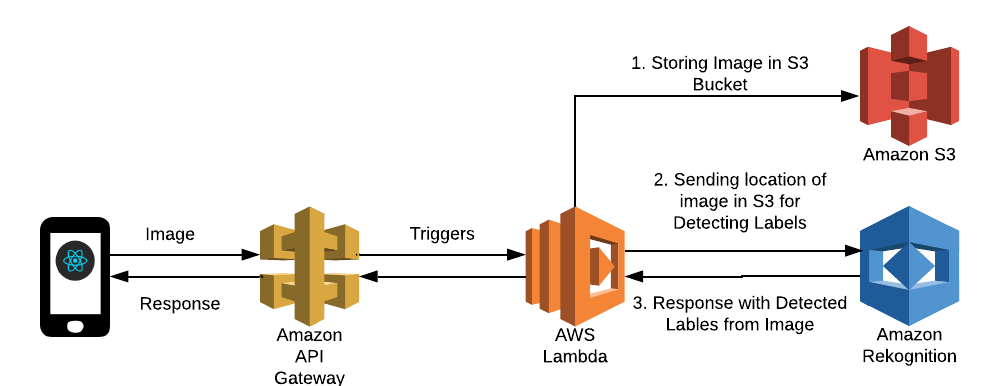
Here we will capture an Image or Select it from file system. We will send that image to API Gateway where it triggers the Lambda Function which will store in S3 Bucket. The stored image is sent to Amazon Recognition which will detect the objects from the image.
Installing dependencies:
Let’s go to React Native Docs, select React Native CLI Quickstart and select our appropriate Development OS and the Target OS as Android, as we are going to build an android application.
Follow the docs for installing dependencies, then create a new React Native Application. Use the command line interface to generate a new React Native project called ObjectDetection.
react-native init ObjectDetectionPreparing the Android device:
We shall need an Android device to run our React Native Android app. This can be either a physical Android device, or more commonly, we can use an Android Virtual Device (AVD) which allows us to emulate an Android device on our computer (using Android Studio).
Either way, we shall need to prepare the device to run Android apps for development. If you have a physical Android device, you can use it for development in place of an AVD by connecting it to your computer using a USB cable and following the instructions here.
If you are using a virtual device follow this link. I shall be using a physical Android device.
Now go to the command line and run react-native run-android inside your React Native app directory
cd ObjectDetection && react-native run-androidIf everything is set up correctly, you should see your new app running on your physical device or Android emulator.
API Creation in AWS Console:
Before going further, create an API in your AWS console following Working with API Gateway paragraph in the following post:
https://medium.com/zenofai/serverless-web-application-architecture-using-react-with-amplify-part1-5b4d89f384f7
Once you are done with creating API come back to the React Native application.
Now, go to your project directory and Replace your App.js file with the following code.
import React, {Component} from 'react';
import {
 StyleSheet,
 View,
 Text,
 TextInput,
 Image,
 ScrollView,
 TouchableHighlight,
} from 'react-native';
import ImagePicker from 'react-native-image-picker';
import Amplify, {API} from 'aws-amplify';
import Video from 'react-native-video';

// Amplify configuration for API-Gateway
Amplify.configure({
 API: {
   endpoints: [
     {
       name: 'LabellingAPI',   //your api name
       endpoint:’<Endpoint-URL>’, //Your Endpoint URL
     },
   ],
 },
});

class Registration extends Component {
 constructor(props) {
   super(props);
   this.state = {
     username: 'storeImage.png',
     userId: '',
     image: '',
     capturedImage: '',
     objectName: '',
   };
 }

// It selects image from filesystem or capture from camera
 captureImageButtonHandler = () => {
   this.setState({
     objectName: '',
   });

   ImagePicker.showImagePicker(
     {title: 'Pick an Image', maxWidth: 800, maxHeight: 600},
     response => {
       console.log('Response = ', response);
       if (response.didCancel) {
         console.log('User cancelled image picker');
       } else if (response.error) {
         console.log('ImagePicker Error: ', response.error);
       } else if (response.customButton) {
         console.log('User tapped custom button: ', response.customButton);
       } else {
         // You can also display the image using data:
         const source = {uri: 'data:image/jpeg;base64,' + response.data};
         this.setState({
           capturedImage: response.uri,
           base64String: source.uri,
         });
       }
     },
   );
 };

// this method triggers when you click submit. If the image is valid then It will send the image to API Gateway.
 submitButtonHandler = () => {
   if (
     this.state.capturedImage == '' ||
     this.state.capturedImage == undefined ||
     this.state.capturedImage == null
   ) {
     alert('Please Capture the Image');
   } else {
     const apiName = 'LabellingAPI';
     const path = '/storeimage';
     const init = {
       headers: {
         Accept: 'application/json',
         'Content-Type': 'application/x-amz-json-1.1',
       },
       body: JSON.stringify({
         Image: this.state.base64String,
         name: 'storeImage.png',
       }),
     };

     API.post(apiName, path, init).then(response => {
       if (JSON.stringify(response.Labels.length) > 0) {
         this.setState({
           objectName: response.Labels[0].Name,
         });
       } else {
         alert('Please Try Again.');
       }
     });
   }
 };

 render() {
   if (this.state.image !== '') {
   }
   return (
     <View style={styles.MainContainer}>
       <ScrollView>
         <Text
           style={{
             fontSize: 20,
             color: '#000',
             textAlign: 'center',
             marginBottom: 15,
             marginTop: 10,
           }}>
           Capture Image
         </Text>
         {this.state.capturedImage !== '' && (
           <View style={styles.imageholder}>
             <Image
               source={{uri: this.state.capturedImage}}
               style={styles.previewImage}
             />
           </View>
         )}
         {this.state.objectName ? (
           <TextInput
             underlineColorAndroid="transparent"
             style={styles.TextInputStyleClass}
             value={this.state.objectName}
           />
         ) : null}
         <TouchableHighlight
           style={[styles.buttonContainer, styles.captureButton]}
           onPress={this.captureImageButtonHandler}>
           <Text style={styles.buttonText}>Capture Image</Text>
         </TouchableHighlight>

         <TouchableHighlight
           style={[styles.buttonContainer, styles.submitButton]}
           onPress={this.submitButtonHandler}>
           <Text style={styles.buttonText}>Submit</Text>
         </TouchableHighlight>
       </ScrollView>
     </View>
   );
 }
}

const styles = StyleSheet.create({
 TextInputStyleClass: {
   textAlign: 'center',
   marginBottom: 7,
   height: 40,
   borderWidth: 1,
   marginLeft: 90,
   width: '50%',
   justifyContent: 'center',
   borderColor: '#D0D0D0',
   borderRadius: 5,
 },
 inputContainer: {
   borderBottomColor: '#F5FCFF',
   backgroundColor: '#FFFFFF',
   borderRadius: 30,
   borderBottomWidth: 1,
   width: 300,
   height: 45,
   marginBottom: 20,
   flexDirection: 'row',
   alignItems: 'center',
 },
 buttonContainer: {
   height: 45,
   flexDirection: 'row',
   alignItems: 'center',
   justifyContent: 'center',
   marginBottom: 20,
   width: '80%',
   borderRadius: 30,
   marginTop: 20,
   marginLeft: 5,
 },
 captureButton: {
   backgroundColor: '#337ab7',
   width: 350,
 },
 buttonText: {
   color: 'white',
   fontWeight: 'bold',
 },
 horizontal: {
   flexDirection: 'row',
   justifyContent: 'space-around',
   padding: 10,
 },
 submitButton: {
   backgroundColor: '#C0C0C0',
   width: 350,
   marginTop: 5,
 },
 imageholder: {
   borderWidth: 1,
   borderColor: 'grey',
   backgroundColor: '#eee',
   width: '50%',
   height: 150,
   marginTop: 10,
   marginLeft: 90,
   flexDirection: 'row',
   alignItems: 'center',
 },
 previewImage: {
   width: '100%',
   height: '100%',
 },
});

export default Registration;
In the above code, we are configuring amplify with the API name and Endpoint URL that you created as shown below.
Amplify.configure({
 API: {
   endpoints: [
     {
       name: '<Your-API-Name>,
       endpoint:’<Endpoint-URL>’,
     },
   ],
 },
});
By clicking the capture button it will trigger the captureImageButtonHandler function. It will then ask the user to take a picture or select from file system. When user captures the image or selects from file system, we will store that image in the state as shown below.
captureImageButtonHandler = () => {
   this.setState({
     objectName: '',
   });

   ImagePicker.showImagePicker(
     {title: 'Pick an Image', maxWidth: 800, maxHeight: 600},
     response => {
       console.log('Response = ', response);
       if (response.didCancel) {
         console.log('User cancelled image picker');
       } else if (response.error) {
         console.log('ImagePicker Error: ', response.error);
       } else if (response.customButton) {
         console.log('User tapped custom button: ', response.customButton);
       } else {
         // You can also display the image using data:
         const source = {uri: 'data:image/jpeg;base64,' + response.data};
         this.setState({
           capturedImage: response.uri,
           base64String: source.uri,
         });
       }
     },
   );
 };
After capturing the image we will preview that image. By Clicking on submit button, submitButtonHandler function will get triggered where we will send the image to the end point as shown below.
submitButtonHandler = () => {
   if (
     this.state.capturedImage == '' ||
     this.state.capturedImage == undefined ||
     this.state.capturedImage == null
   ) {
     alert('Please Capture the Image');
   } else {
     const apiName = 'LabellingAPI';
     const path = '/storeimage';
     const init = {
       headers: {
         Accept: 'application/json',
         'Content-Type': 'application/x-amz-json-1.1',
       },
       body: JSON.stringify({
         Image: this.state.base64String,
         name: 'storeImage.png',
       }),
     };

     API.post(apiName, path, init).then(response => {
       if (JSON.stringify(response.Labels.length) > 0) {
         this.setState({
           objectName: response.Labels[0].Name,
         });
       } else {
         alert('Please Try Again.');
       }
     });
   }
 };
Lambda Function:
Add the following code into your lambda function that you created in your AWS Console.
const AWS = require('aws-sdk')
var rekognition = new AWS.Rekognition()
var s3Bucket = new AWS.S3( { params: {Bucket: "<Your-Bucket>"} } );
var fs = require('fs');
exports.handler = (event, context, callback) => {
   let parsedData = JSON.parse(event)
   let encodedImage = parsedData.Image;
   var filePath = parsedData.name;
   let buf = new Buffer(encodedImage.replace(/^data:image\/\w+;base64,/, ""),'base64')
   var data = {
       Key: filePath,
       Body: buf,
       ContentEncoding: 'base64',
       ContentType: 'image/jpeg'
   };
   s3Bucket.putObject(data, function(err, data){
       if (err) {
           console.log('Error uploading data: ', data);
           callback(err, null);
       } else {
           var params = {
             Image: {
              S3Object: {
               Bucket: "<Your-Bucket>",
               Name: filePath
              }
             },
             MaxLabels: 10,
             MinConfidence: 90
            };
           rekognition.detectLabels(params, function(err, data) {
               if (err){
                   console.log(err, err.stack);
                   callback(err)
               }
               else{
                   console.log(data);
                   callback(null, data);
               }
           });
       }
   });
};
In the above code, we would receive the image from React Native which we are storing in S3 Bucket. The stored image is sent to Amazon Recognition which has detectLabels method that detects the labels from the image and sends the response with the detected labels in JSON format.

Once you capture an image you can see a preview of that image as shown below.

On submitting the captured image you can see the label of that image as shown below:

That’s all folks! I hope it was helpful.
For any queries drop them in the comments section.
This story is authored by Dheeraj Kumar and Venu Vaka. Dheeraj is a software engineer specializing in React Native and React based frontend development. Venu is a software engineer specializing in ReactJS and AWS Cloud.
Comments